The importance of proper wheel torque sequence is often underestimated when it is in fact critical for installation and to ensure safety on the road.
“Using the correct tools, procedures and patterns prevents cracking of the wheel and damage to fastener threads or stretching of the studs, which all affect the overall performance of the wheel,” advises Michael Nichols, National Sales manager for Alcoa Wheels Australia.
“Brake drums, rotors and hubs can also become warped if the torqueing procedure isn’t followed correctly,” he adds.
Do It Once; Do It Right
Below is an Alcoa Wheels expert-driven, step-by step set of instructions and key information to consider when installing your wheels:
HOW-TO: PRE-TORQUE PREPARATION
- Clean all mating surfaces:
- Clean the hub or drum.
- Clean the wheels.
- Alignment sleeve. This is an optional step that can help both centre the wheels and protect the studs. You want to make sure everything is aligned when installing wheels.
- Install wheels over sleeves to help protect the studs.
- Lubricate the nuts. Add 1-2 drops of oil directly on to the stud. Also add 1-2 drops of oil between the nut and the free spinning washer.
- Install the wheel nuts hand tight (follow the Proper Torque Sequence below).
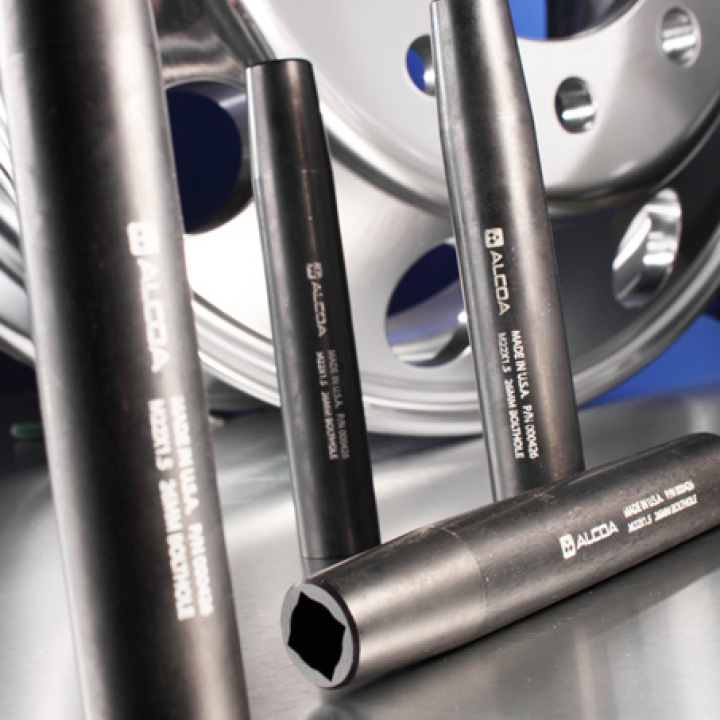
Alcoa® Wheels’ genuine E-Z Mount Wheel Alignment Sleeves (Part Number 000426) were designed to support the wheel mounting process and assist in lining up wheel end components for ease of installation. They may also help seat a brake drum.
HOW TO: PROPER TORQUE SEQUENCE
Getting it right first time will help prevent wheel troubles and save on unnecessary wheel repairs and replacements. Download and print out one page factsheet below to keep on hand as a quick reference.
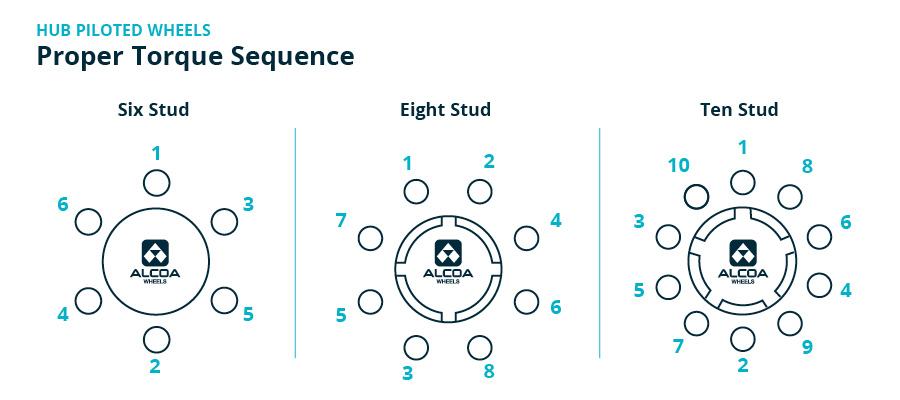
- Position one of the hub’s pilot pads at the twelve o’clock position, installing the wheel nuts hand tight. Then move to the bottom (6 o’clock), then in a criss-cross pattern until complete.
- After positioning wheels on the pilot pads, hand tighten all two-piece flange nuts.
- Next, tighten to the recommended torque following the proper sequence shown above for your wheel type.
- After a wheel assembly has been installed and torqued, check the fastener torque again within 5 – 100 kilometres. Individual fleet conditions will influence the mileage interval.
HOW TO: MORE TORQUE TIPS
Type of torque wrenches. The dowel indicator type torque wrenches help indicate if there is movement while the clicker type torque wrenches will not indicate if there is movement. Breakaway torque wrenches work similarly to the clicker torque wrenches.
The right methods and numbers. The “good enough, tight enough method” is NOT recommended.
Brad Clegg, NSW State Sales Manager for Alcoa Wheels says customers talk with him a fair bit about torqueing: “An Alcoa wheel has the correct torqueing pressure stamped on the wheel where the Alcoa Roll Stamp is, so when tightening a wheel you can reference this.”
Setting the torque wrench guns to the highest setting is going to damage the fasteners.
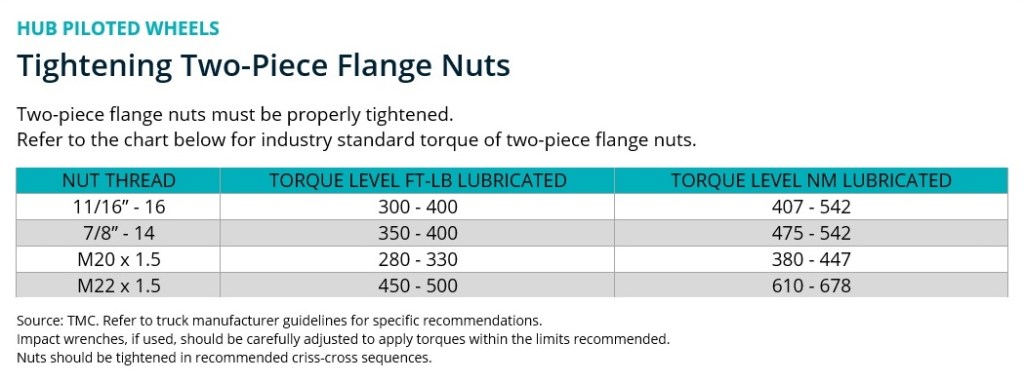
The correct method is to hand tighten the two-piece flange nuts, then tighten to the recommended torque with your calibrated torque wrench. The wheel nut MUST move 1/4 turn before arriving at final torque.
Over-torqueing is just as damaging as under-torqueing.
Test drive. Following the wheel installation, a 5km test drive is recommended. You want to see what you need to do to get a little movement in that joint and if there is, in fact, any movement there. If done right, there will not be any movement, and you’re ready to roll.
Always refer to the Alcoa Wheels Service Manual.
Listen to more expert Torque talk over at the Behind the Wheels Podcast:
Make Sure It’s An Alcoa® Wheel
To spec your wheels, ring ![]() 1800 955 191 to talk with our wheel experts, or fill out a contact form and we will reach out to you to answer your questions and discuss your specifications.
1800 955 191 to talk with our wheel experts, or fill out a contact form and we will reach out to you to answer your questions and discuss your specifications.


